
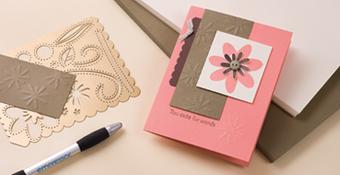
Here's a quick lesson on making elegant cards with dry embossing.
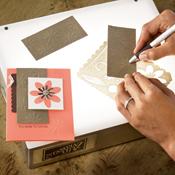
1) Secure the Classy Brass template to a light source (a light table or window) with a small piece of tape.
2) Rub waxed paper on the surface of the card stock so the stylus will glide more smoothly and to help prevent tears in the paper.
3) Place the paper or card stock face down over the template, positioning it so that you'll have the image where you want it.
4) Using the large end of the stylus tool, press the paper through the open areas of the template. This will produce a raised image. Use the small end of the stylus to emboss small areas if needed.
Tips:
1) When dry embossing a large open area, press only around the edges of the template, not the entire open area.
2) If a colored raised image is desired, replace the brass template on the right side of the card. It will act as a mask to protect the unraised surfaces. Apply color with a small sponge or sponge daubers using our ink pads or Stampin' Pastels.
3) If you're having a hard time seeing the template through some of our darker colors of card stock, try dry embossing on our background papers instead.
4) Classy Brass templates aren't the only product we carry that works great with dry embossing. Try any of our shape or journaling stencils, the Plaidmaker, even The Tearing Edge!


No comments:
Post a Comment