Tuesday, August 29, 2006

Stampin' Fairy

The Stampin' Fairy was at my house Friday night! She came bearing goodwill for all. See if you can find her:


But then the Fairy was tragically overpowered by the evil princess who stole her crown and tapped her on the head with the magical wand as we all watched in horror:

Soon, however, order was restored, the evil princess repented, and the world was happy again:


The End.

what a wonderful world


remember that song?

I see trees of green, red roses too
I see them bloom from me and you
But I think to myself what a wonderful world

I see skies of blue, clouds of white
bright blessed days, dark sacred nights
but i think to myself what a wonderful world

The colours of the rainbow so pretty in the sky
Are also on the faces of people passing by
I see friends shakin' hands saying "How do you do?"
They're really saying "I love you"
I hear babies crying, I watch them grow
They'll learn much more than I'll never know
But I think to myself what a wonderful world
I think to myself what a wonderful world
Hey, yeah, wonderful, wonderful world
When I look at these photos from our summer vacation at my sister's, that song echoes in my head. It just doesn't get much better than this:

Sunday, August 27, 2006

As I promised


We're back to stamping! Today, we will go over heat embossing. If you stamp with me, then you've embossed. This is a simple tutorial but it must come before we go on to more detailed embossing techniques.

Directions:
1) Place your card stock in a Powder Pal tray (or over a large piece of scratch paper).
2) Rub the Embossing Buddy across the paper or card stock you want to emboss. (This keeps embossing powder from sticking anywhere but on the ink.)
3) Stamp image with Craft, VersaMark, or embossing ink {like Top Boss}.
4) Pour powder onto the inked image, making sure that the image is coated completely.
5) Shake off excess powder into the tray and funnel it back into its container.
6) Heat the stamped image with the heat tool until the powder changes to a shiny liquid and raises.
7) Allow embossed image to cool.


Tips:
1) Don't overheat the powder, as it can scorch the paper.
2) Try embossing using Classic pads on vellum paper. Dye inks take longer to dry on vellum so embossing powders will adhere to the ink and can be embossed.
3) To add a brighter touch to computer-printed text, sprinkle embossing powder on the card stock as it is coming out of the printer. Be fast! This is quick-drying ink!

Saturday, August 26, 2006

All Blog ... all the time

Blogging is wonderful, quick and free, so I'm going to all blog, all the time.

A few quick items:
First, I'm deleting my Stampin' Up! website because
{a} it's not cheap and
{b} it doesn't seem to be really serving the purpose I had hoped.
Maybe in the future I'll consider it again, but for now, my money can work for me in other areas with more results. I'll continue to send emails out with class/club info, and post upcoming events here as well.

Second, there may be a few minor changes to the Stamp Clubs. I'm trying to re-evaluate my time after a terribly hectic summer.

I almost lost "it" a few times this summer {not sure what "it" really is, but you get the idea here}. It was tough, and I finally reached the point where I realized I need to re-priortize my life. This is something I have neglected for a long time - you know how it happens, you start one thing, then think, well I could add another, I'm not that busy ... then before you realize it, you're overwhelmed, and you can't see light at the other end ... but how can you say NO to all these wonderful people?

The good news is that my work schedule is returning to normal. The temporary summer job has ended, and school has started back which means we'll have some sort of loose schedule now {don't want to be too confined!}

I read something this summer that really hit home. It was written by Aby Garvey who is a professional organizer. She publishes an e-zine with tips and hints about organizing your home and life to be more efficient so that you can make time for the important things. This summer, in her blog, Aby talked about cleaning out and making space - that makes perfect sense when you're talking about closets and such - but Aby was talking about making space in life. Making space for those things that are truly important.

That was the visual I needed ... it hit me and instantly I understood. I needed to create some space in my life. I needed to get in there and really clean out all those things that were keeping me from doing the important stuff. I was in the place where I found myself running around trying to please all these other people who weren't my family members. I was neglecting my family!

So, I am happy to report that I am in the process of creating space in my life, so that I can pursue the truly important things. Yes, there are the must-do things like work, but if I can clear out all the clutter, then I should have time for work, family and fun. So please bear with me while I decide what to do with all my clutter. You can read Aby's original post by clicking here: Creative Organizing

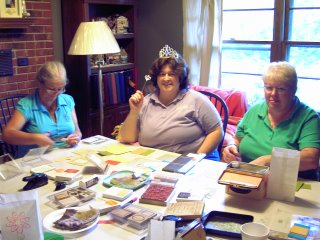
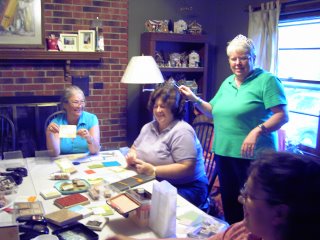
Finally, thank you ladies in my stamp clubs, what a wonderful group of ladies you are! You've been with me from the beginning and continue to add light to my life ~ I look forward to stamp clubs every month, seriously.

Signing off for now ... next post stamping related, I promise!

Monday, August 21, 2006

Proud mama again


In July I posted how proud I was of our son who just graduated from high school {we homeschooled him from 1st grade on}. If you will excuse me, I want to indulge myself again ... I'm once again very, very proud of our son - the oldest of 3 - who begin college today! As the oldest, his firsts are really big ones for mom and dad. He has also been our guinea pig of sorts while we tried to figure out this parenting thing ... despite our failings, he has turned out to be a really neat kid. He only has one class on Mondays, but it was still significant being his first day. All went well - and he came home to take a long nap as any teenager worth his weight would do!

Tuesday, August 15, 2006

Marking In Color ...

I think most everyone has seen the new *In Colors* by Stampin' Up! The colors are great ... fresh ... really nice to create cards, scrap pages, or embellish your home decor. But, there are no markers to go with these new hip colors ... until now. I learned a really neat trick from SU! that I want to share here with you:

Did you know you can create your own In Color markers with the Classic ink refill and a blender pen? Simply add several drops from the ink refill to one side of the blender pen. We found that five drops was a good amount, and our artists achieved terrific results when coloring with the marker on card stock and paper.

You can also use the pen with the Color Spritzer Tool and to color directly on a rubber image before stamping. One set of blender pens will allow you to create markers for all six In Colors


The In Color palette, a collection of six colors, is available only through June 2007.


Monday, August 07, 2006

Love Your Heart

There is a new stamp set out for a limited time ... A Light Heart ... Stampin' Up! will offer this set from Aug. 15 - September 30. With each sale of the set, SU will donate $2 to the American Heart Association. What a great way to raise funds for a worthy cause. I am planning a stamp camp around this set, so watch your email for information on date and time. Below you can see a flyer with all the images from A Light Heart set.